Stylish Hairstyles For Women
1. Top Knot

To reexamine the topknot, we would not like to maneuver the topknot again into a super tight and smooth J.Lo-style bun. Rather we styled this all the more freely, so you can in any case value Amanda's twists. What's more, the best part is the point at which she brings this bun down she's not forgotten with extended twists with a scratch in them.
Begin with dry hair, not wet hair. That way when you bring your hair down it's not extended or marked.
Splash your hairline with a light layer of adaptable hairspray, for example, R&CO flex hairspray Outer Space or Evacuee's Flexible Hold Hairspray. These are sufficiently adaptable that they won't chip.
Rub a grease between your hands to give your hair light control as you're styling it.
Flip your head Topsy turfy and delicately assemble your hair at the highest point of your head. Make a point not to rake your fingers through your hair as you do this, which upsets the twist. This topknot looks better when it isn't pulled firmly or consummately.
Tie your hair into a bunch and utilize long bobby pins to anchor it – don't utilize a hairpin! Tuck the closures of your hair into the bunch and stick.
Once the best bunch is secure you can go in and maneuver the bunch into put, tucking in any hairs that are standing out with a rodent tail brush.
This bunch is a more present day variant of the conventional bun which includes pulling the hair firmly and utilizing a clasp, leaving a scratch in your hair when you bring it down later. Along these lines you don't need to wash your twists again and begin once again the following day.
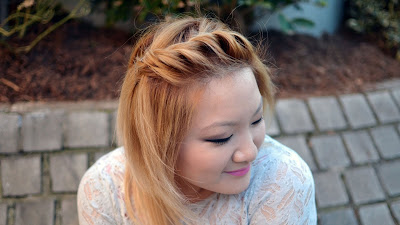
2. Profound Side Part

We cherish the surface and state of Ishia's hair so we needed to work with it, as opposed to endeavoring to smooth it back or battle it. We solidly trust that indeed, obviously finished hair is proficient! This style displays your characteristic surface while keeping it stuck once again from your face and out of your way.
Make a profound side part, take a little segment from your part down to the highest point of the ear.
Freely take a brush (a toothbrush, prodding brush or pig bristle brush would work, you can get them at the magnificence supply store for only $1) to smooth back the roots.
Gap the area into 2 and curve these around each other, stick it back leaving the closures free. Gold bobby pins can be a fun method to spruce up the look.
Over the other ear, take a 3-inch area and bend it way up yonder, into the clouds from the face, making an undercut impact. Bobby stick to anchor and utilize grease to smooth the roots.
3. Turns
On the off chance that the hair at the back of your head is a thick, tight surface like Tey's, it tends to be difficult to style without anyone else's input. Be that as it may, as long as you have a decent trimmed and shape you can leave the back of your hair out in a wash and go and concentrate your styling endeavors on the hair confining your face.
Before you begin, daintily coat your fingers with a sticky grease item, this will help keep little hairs from standing out as you're winding your hair. For this surface, beautician Ruben Rosales suggests Davies Finishing Gum.
Utilize the pointy end of a rodent tail brush or a prodding brush to make a spotless part – this is basic to influencing this style to look flawless and proficient.
Take a 3-inch segment from the from the piece of the hair line to directly behind the ear. Draw your 3-inch area in the state of a triangle to avert resembling a kids' level bend style.
Turn the area upwards towards the highest point of your head. To complete a level contort on yourself, bring your hands behind your head pulling the hair back, as opposed to attempting to bend with your hands before your head. It is considerably less demanding along these lines!
Rehash a similar procedure over the other ear - make a section on the contrary side and take a 3-inch segment from the hairline to directly behind the ear. Wind this area towards the highest point of the head and secure with bobby pins.
4. Side Bun

Amanda commonly wears her hair in a pig tail or half up. Ladies with long hair regularly tend to pull their hair up in a braid, so we needed to give you a couple of more choices.
Draw all hair from the correct side over to one side and make a free braid.
Partition the pig tail into 2 areas and fold them over each other, making an extensive curve.
When you get to the base of the wind, fold it over into a S-shape to give it a more fascinating shape than your run of the mill bun. Stick set up with bobby pins. The less mind boggling the better, simply put the pins where it feels secure.
It's essential to keep the bun put simply behind the ear and lower towards the scruff, instead of down at the hairline since that would look excessively like a prom style. As a rule, draw a fanciful line from the jaw line up and back to keep the bun in a position that is complimenting.
5. Side Swept Curls

Anna says "beside pulling my hair back I extremely just have one look since it's so short. What's more, I never rectify my hair, it's wavy 100% of the time." We adored Anna's volume and would not like to pull her hair back or excessively control it, so Ruben ad libber by utilizing a headband to make "hair gems."
To keep definition with twist design like Anna's, utilize a styling cream or a light gel like Evacuee Ultra Defining Gel on drenching wet hair that has been brushed with a wide tooth brush.
Once the hair is completely dry, shower Evacuee Mist-er Right to set the twist and anticipate frizz. In the event that you require volume, utilize fingers to daintily scrunch the twists.
Make a side part and draw back hair on one side of the head. Stick your headband or hair gems into put over the ear.
This is a celebrity central that can mean every day wear since it's not overcompensated or excessively controlled. Ruben calls attention to that "a ton of what you're seeing on celebrity lane is extremely straightforward. At the point when my representatives customers come in they need something that looks easy, it's as yet done and still cleaned however they need it to be like what Julianne Rough is doing on celebrity main street - so this is a wavy form of that.
6. Current Mohawk

Tey normally wears wigs and twists her hair down when she goes to work. She was astounded by how simple this style was to do and left our shoot anticipating giving this a shot herself for work.
Snatch 2-inch segments of hair and stick them back, beginning at the brow and working your hair back.
Rehash this activity, cutting the greater part of the hair back on the two sides of the go to make a Mohawk impact.
Delicately coat the fingers with grease to smooth the hair at the sanctuaries.
Tenderly shape the hair that is forgotten with your fingers, utilizing bobby pins to stick any hair that is standing out.
This style does not should be exact, in certainty a gentler shape is more natural and female and maintains a strategic distance from the rocker-style Mohawk we're generally acquainted with. Again this style pulls hair far from the face, while as yet exhibiting your normal surface.
7. Half-Up do

Cassandra normally pulls her hair back, so we needed to surrender her a half choice that keeps her hair hauled back and out of her way. Cassandra has multi-finished hair, which Ruben cherishes working with in light of the fact that there are such a significant number of twist examples to emphasize.
On the off chance that beginning on dry hair, re-fog the hair with Evacuee Mist-er Right and rub a medium hold gum between your fingers.
Take a pencil or rodent tail brush and hold it vertical at the curve of the temples to locate your most complimenting side part
Backcomb marginally at the crown of the make a beeline for make some volume. On the off chance that you have firmly looped or delicate hair skirt this progression to stay away from breakage.
Fog the hair with shower and utilize the side of the hairspray can to smooth the hair back behind the ear – the can is smooth and won't disturb your twists the manner in which your fingers can.
Stick the hair back behind the ear with 6 bobby pins, make an example with the pins, leaving the level side looking out. Force the finishes of that segment of hair over the back of your head and stick into put.
Haul a segment of hair behind the other ear and comparatively pull it over the back of your head, sticking it into put.
8. Less demanding Than It Looks Updo

Tiffany regularly blow dries her hair and level irons it straight to go to fill in as a bookkeeper. When she wears her hair wavy she commonly pineapples it and leaves the twists free. With this style Tiffany can avoid the fixing procedure while as yet keeping up a simple to-oversee style.
Make a side part. Take a croc clasp and clasp a 3-4 inch segment of hair next to you part to keep it off the beaten path.
Take a 2-inch segment behind the ear and wind it far from your face, towards the back of your head. Stick it forgetting the closures.
Keep turning segments move in an opposite direction from your face, sticking them and forgetting the closures until the point that you have 2-3 curves over every ear.
Bring down the segment in the croc clasp, and utilize DevaCurl Pomade Set Up or more to smooth down any flyways around the hairline. At that point utilize Oribe Impermeable Hairspray to keep the hairline characterized and keep frizz from mugginess. We don't need it to watch smooth or rectify the twists, despite everything you need your twist definition to appear. You can utilize the side of the hairspray can to smooth the hair down instead of brushing or disturbing the twists with your fingers.
Take the rest of the area encircling the face and gap it into 2. Complete a rope plait curving them around each other and stick the wind behind the head.

To reexamine the topknot, we would not like to maneuver the topknot again into a super tight and smooth J.Lo-style bun. Rather we styled this all the more freely, so you can in any case value Amanda's twists. What's more, the best part is the point at which she brings this bun down she's not forgotten with extended twists with a scratch in them.
Begin with dry hair, not wet hair. That way when you bring your hair down it's not extended or marked.
Splash your hairline with a light layer of adaptable hairspray, for example, R&CO flex hairspray Outer Space or Evacuee's Flexible Hold Hairspray. These are sufficiently adaptable that they won't chip.
Rub a grease between your hands to give your hair light control as you're styling it.
Flip your head Topsy turfy and delicately assemble your hair at the highest point of your head. Make a point not to rake your fingers through your hair as you do this, which upsets the twist. This topknot looks better when it isn't pulled firmly or consummately.
Tie your hair into a bunch and utilize long bobby pins to anchor it – don't utilize a hairpin! Tuck the closures of your hair into the bunch and stick.
Once the best bunch is secure you can go in and maneuver the bunch into put, tucking in any hairs that are standing out with a rodent tail brush.
This bunch is a more present day variant of the conventional bun which includes pulling the hair firmly and utilizing a clasp, leaving a scratch in your hair when you bring it down later. Along these lines you don't need to wash your twists again and begin once again the following day.
2. Profound Side Part

We cherish the surface and state of Ishia's hair so we needed to work with it, as opposed to endeavoring to smooth it back or battle it. We solidly trust that indeed, obviously finished hair is proficient! This style displays your characteristic surface while keeping it stuck once again from your face and out of your way.
Make a profound side part, take a little segment from your part down to the highest point of the ear.
Freely take a brush (a toothbrush, prodding brush or pig bristle brush would work, you can get them at the magnificence supply store for only $1) to smooth back the roots.
Gap the area into 2 and curve these around each other, stick it back leaving the closures free. Gold bobby pins can be a fun method to spruce up the look.
Over the other ear, take a 3-inch area and bend it way up yonder, into the clouds from the face, making an undercut impact. Bobby stick to anchor and utilize grease to smooth the roots.
3. Turns

On the off chance that the hair at the back of your head is a thick, tight surface like Tey's, it tends to be difficult to style without anyone else's input. Be that as it may, as long as you have a decent trimmed and shape you can leave the back of your hair out in a wash and go and concentrate your styling endeavors on the hair confining your face.
Before you begin, daintily coat your fingers with a sticky grease item, this will help keep little hairs from standing out as you're winding your hair. For this surface, beautician Ruben Rosales suggests Davies Finishing Gum.
Utilize the pointy end of a rodent tail brush or a prodding brush to make a spotless part – this is basic to influencing this style to look flawless and proficient.
Take a 3-inch segment from the from the piece of the hair line to directly behind the ear. Draw your 3-inch area in the state of a triangle to avert resembling a kids' level bend style.
Turn the area upwards towards the highest point of your head. To complete a level contort on yourself, bring your hands behind your head pulling the hair back, as opposed to attempting to bend with your hands before your head. It is considerably less demanding along these lines!
Rehash a similar procedure over the other ear - make a section on the contrary side and take a 3-inch segment from the hairline to directly behind the ear. Wind this area towards the highest point of the head and secure with bobby pins.
4. Side Bun

Amanda commonly wears her hair in a pig tail or half up. Ladies with long hair regularly tend to pull their hair up in a braid, so we needed to give you a couple of more choices.
Draw all hair from the correct side over to one side and make a free braid.
Partition the pig tail into 2 areas and fold them over each other, making an extensive curve.
When you get to the base of the wind, fold it over into a S-shape to give it a more fascinating shape than your run of the mill bun. Stick set up with bobby pins. The less mind boggling the better, simply put the pins where it feels secure.
It's essential to keep the bun put simply behind the ear and lower towards the scruff, instead of down at the hairline since that would look excessively like a prom style. As a rule, draw a fanciful line from the jaw line up and back to keep the bun in a position that is complimenting.
5. Side Swept Curls

Anna says "beside pulling my hair back I extremely just have one look since it's so short. What's more, I never rectify my hair, it's wavy 100% of the time." We adored Anna's volume and would not like to pull her hair back or excessively control it, so Ruben ad libber by utilizing a headband to make "hair gems."
To keep definition with twist design like Anna's, utilize a styling cream or a light gel like Evacuee Ultra Defining Gel on drenching wet hair that has been brushed with a wide tooth brush.
Once the hair is completely dry, shower Evacuee Mist-er Right to set the twist and anticipate frizz. In the event that you require volume, utilize fingers to daintily scrunch the twists.
Make a side part and draw back hair on one side of the head. Stick your headband or hair gems into put over the ear.
This is a celebrity central that can mean every day wear since it's not overcompensated or excessively controlled. Ruben calls attention to that "a ton of what you're seeing on celebrity lane is extremely straightforward. At the point when my representatives customers come in they need something that looks easy, it's as yet done and still cleaned however they need it to be like what Julianne Rough is doing on celebrity main street - so this is a wavy form of that.
6. Current Mohawk

Tey normally wears wigs and twists her hair down when she goes to work. She was astounded by how simple this style was to do and left our shoot anticipating giving this a shot herself for work.
Snatch 2-inch segments of hair and stick them back, beginning at the brow and working your hair back.
Rehash this activity, cutting the greater part of the hair back on the two sides of the go to make a Mohawk impact.
Delicately coat the fingers with grease to smooth the hair at the sanctuaries.
Tenderly shape the hair that is forgotten with your fingers, utilizing bobby pins to stick any hair that is standing out.
This style does not should be exact, in certainty a gentler shape is more natural and female and maintains a strategic distance from the rocker-style Mohawk we're generally acquainted with. Again this style pulls hair far from the face, while as yet exhibiting your normal surface.
7. Half-Up do

Cassandra normally pulls her hair back, so we needed to surrender her a half choice that keeps her hair hauled back and out of her way. Cassandra has multi-finished hair, which Ruben cherishes working with in light of the fact that there are such a significant number of twist examples to emphasize.
On the off chance that beginning on dry hair, re-fog the hair with Evacuee Mist-er Right and rub a medium hold gum between your fingers.
Take a pencil or rodent tail brush and hold it vertical at the curve of the temples to locate your most complimenting side part
Backcomb marginally at the crown of the make a beeline for make some volume. On the off chance that you have firmly looped or delicate hair skirt this progression to stay away from breakage.
Fog the hair with shower and utilize the side of the hairspray can to smooth the hair back behind the ear – the can is smooth and won't disturb your twists the manner in which your fingers can.
Stick the hair back behind the ear with 6 bobby pins, make an example with the pins, leaving the level side looking out. Force the finishes of that segment of hair over the back of your head and stick into put.
Haul a segment of hair behind the other ear and comparatively pull it over the back of your head, sticking it into put.
8. Less demanding Than It Looks Updo

Tiffany regularly blow dries her hair and level irons it straight to go to fill in as a bookkeeper. When she wears her hair wavy she commonly pineapples it and leaves the twists free. With this style Tiffany can avoid the fixing procedure while as yet keeping up a simple to-oversee style.
Make a side part. Take a croc clasp and clasp a 3-4 inch segment of hair next to you part to keep it off the beaten path.
Take a 2-inch segment behind the ear and wind it far from your face, towards the back of your head. Stick it forgetting the closures.
Keep turning segments move in an opposite direction from your face, sticking them and forgetting the closures until the point that you have 2-3 curves over every ear.
Bring down the segment in the croc clasp, and utilize DevaCurl Pomade Set Up or more to smooth down any flyways around the hairline. At that point utilize Oribe Impermeable Hairspray to keep the hairline characterized and keep frizz from mugginess. We don't need it to watch smooth or rectify the twists, despite everything you need your twist definition to appear. You can utilize the side of the hairspray can to smooth the hair down instead of brushing or disturbing the twists with your fingers.
Take the rest of the area encircling the face and gap it into 2. Complete a rope plait curving them around each other and stick the wind behind the head.


Comments
Post a Comment